Detox and React Native: UI testing Android permission flows
I’m currently learning React Native and Expo as an alternative to native app development. To do this, I’ve been working on an app so that I can get hands-on experience with React Native app development. This includes end-to-end UI testing, using Detox.
I was surprised that Detox doesn’t have an API to interact with permissions. The
device.launchApp function does have a permissions field, but this only works
on iOS and runs on app start-up - it doesn’t allow you to test the actual user
flow.
In this article, I will explain how you can do end-to-end testing with Android permissions, including simulating user interaction with the Android permission request modal.
Starting the app without permissions #
By default, Detox will start the app with all permissions granted. This will not be the case when an actual user runs the app. To work around this, we’ll need to reset all permissions using adb.
import { expect } from "detox";
import { execSync } from "child_process";

const packageName = "com.example.app_package_name";

function resetPermissions() {
	execSync(`adb -e -s ${device.id} shell pm reset-permissions -p ${packageName}`);
}

describe("Permission request card", () => {
	beforeAll(async () => {
		resetPermissions();

		await device.launchApp({
			newInstance: true,
		});
	});
});
Programmatically granting and revoking permissions #
You may want to programmatically grant or revoke a permission without having to go through the system UI. You can do that using the following adb commands:
function grantPermission(permission: string) {
	execSync(`adb -e -s ${device.id} shell pm grant ${packageName} ${permission}`);
}

function revokePermission(permission: string) {
	execSync(`adb -e -s ${device.id} shell pm revoke ${packageName} ${permission}`);
}

// Inside a test:
grantPermission("android.permission.ACCESS_FINE_LOCATION");
revokePermission("android.permission.ACCESS_FINE_LOCATION");
Interacting with the Android permission request modal #
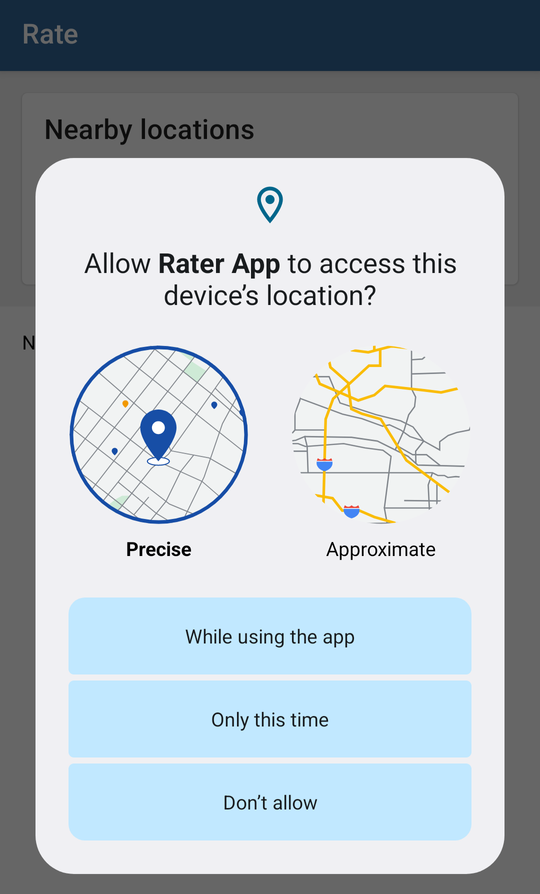
Let’s say you have a UI where the user is shown a permission justification. They can then click a button to open up the permission request modal and grant permission.
Using key events to control system UIs #
Unfortunately, Detox does not provide an API for interacting with System UIs like the permission request modal.footnote 1 Instead, we can use adb to interact with the modal using the keyboard.
Detox has a feature called synchronization, where it waits for the app to become
idle before proceeding with the test. This means that tap() will freeze when a
system UI modal is open. We’ll need to disable this before tapping.
import { expect } from "detox";
import { execSync } from "child_process";

const Key_Tab = "KEYCODE_TAB";
const Key_Enter = "KEYCODE_ENTER";

function sleep(ms: number): Promise<void> {
	return new Promise(resolve => setTimeout(resolve, ms));
}

async function pressKeys(keys: string[]) {
	for (let key of keys) {
		execSync(`adb -e -s ${device.id} shell input keyevent ${key}`);
		await sleep(100);
	}
}

describe("Permission request card", () => {
	it("should ask for permission", async () => {
		await expect(element(by.id("current-location-msg"))).toHaveText(
			"Grant location permission to see nearby locations here."
		);

		// Disable synchronization, otherwise "tap" will never return due
		// to the appearance of System UI
		await device.disableSynchronization();
		await element(by.id("btn-grant")).tap();
		await sleep(1000);
		await device.enableSynchronization();

		// Use the keyboard to select the button
		//
		// For location permissions, there are 4 tabs as there is a selector
		// between precise and coarse locations.
		//
		// For other permissions, you may only need 2 tabs.
		await pressKeys([ Key_Tab, Key_Tab, Key_Tab, Key_Tab, Key_Enter ]);

		// Check UI updates
		await expect(element(by.id("current-location-msg"))).not.toHaveText(
			"Grant location permission to see nearby locations here."
		);
	});
});
Using uiautomator and touch events to control system UIs #
In the above solution, we hardcode the number of “tab” presses to select the correct button in the system modal. This is a fairly hacky solution that is likely to break on Android OS updates.
A much better solution would be using uiautomator to find the on-screen
position of the button we’re looking for. This is more complicated but should be
more reliable. To do this, we can use the dump command to export an xml file
representing the GUI hierarchy:
adb shell uiautomator dump
adb shell cat /sdcard/window_dump.xml
The button looks like this in the XML:
<node index="0" text="While using the app"
	resource-id="com.android.permissioncontroller:id/permission_allow_foreground_only_button"
	class="android.widget.Button"
	package="com.google.android.permissioncontroller"
	content-desc="" checkable="false" checked="false"
	clickable="true" enabled="true" focusable="true" focused="false"
	scrollable="false" long-clickable="false" password="false"
	selected="false" bounds="[137,1273][943,1427]" />
With an XML parser, we can find the correct node and read the “bounds” attribute:
import { JSDOM } from "jsdom";

function findSystemUINodePosition(resourceId: string): [number, number] | undefined {
	// Dump window hierarchy
	execSync(`adb -e -s ${device.id} shell uiautomator dump`);
	const windowDump = execSync(`adb -e -s ${device.id} shell cat /sdcard/window_dump.xml`);

	// Parse XML
	const jsdom = new JSDOM(windowDump.toString(), { contentType: "text/xml" });
	const document = jsdom.window.document;

	// Find the node
	const buttonNode = document.querySelector(`node[resource-id='${resourceId}']`);
	if (!buttonNode) {
		console.error("Unable to find button");
		return undefined;
	}

	// Get bounds
	const bounds = buttonNode.getAttribute("bounds");
	const parts = bounds?.match(/\[(\d+),(\d+)\]\[(\d+),(\d+)\]/);
	if (!parts) {
		console.error("Unable to match bounds");
		return undefined;
	}

	// Return center point
	const x = (parseInt(parts[1]) + parseInt(parts[3])) / 2;
	const y = (parseInt(parts[2]) + parseInt(parts[4])) / 2;
	return [x, y];
}
We can then tap on the button:
import jestExpect from "expect";

function tapAt(x: number, y: number) {
	execSync(`adb -e -s ${device.id} shell input tap ${x} ${y}`);
}

// Instead of "pressKeys" above
const resourceId = "com.android.permissioncontroller:id/permission_allow_foreground_only_button";
const point = findSystemUINodePosition(resourceId);
jestExpect(point).toBeTruthy();
tapAt(point[0], point[1]);
Conclusion #
Hopefully, Detox will have built-in support for permissions in the future. Until then, I hope this article is helpful to others.
Detox feature request for a permissions API: https://github.com/wix/Detox/issues/2184 ↩︎


Comments
Hi Andrew,
Thank you for the temporary workaround idea. These approaches work fine on my local environment, but I’m experiencing the freeze issue you mentioned when running tests on the GitLab runner, even though I’ve disabled synchronization as you suggested.
Do you have any recommendations on this? Why might this solution not be working on the GitLab runner? (macos)
Thanks!
I don’t know as I never got around to running this in CI. But let me know if you find the answer!